Adding Content: Images

Top
  • ProcessWire Made Easy: HollyWorks Help Site logo

    • Website Design & Layout
      • Primary Navigation
      • Footers
      • Social Icons
      • Facebook Sharing Image
      • Button colors, shapes
      • Sidebar Additions
      • Logos
      • Menubar
      • Code (eg. Google Analytics)
      • Page Top Options: Slides, Video
    • How to...
      • Logging In and Out
      • The Document Tree
      • Create a Page
      • Choosing a Template
      • Basic Page Layout
      • Editing a Page
      • Adding Content: Text
      • Styling text: Blockquotes
      • Adding Content: Images
      • Cropping & Resizing Images
      • Adding Content: Links & PDFs
      • Adding Content: Video
      • Viewing a page
      • Page Commands: Move, Hide, Delete
      • Page Top Photos
      • Page Tops: Slides and Video
      • Feeds: Blog, Events, News, Logos
      • META Data
      • Add code to the template (Google Analytics, etc.)
      • Create Sitewide Navigation
    • Content Features
      • Blog
      • Blog Authors
      • Calendar
      • Media
      • News
      • Photo Galleries
      • Priorities
      • Publication Library
      • Legislative Tracker
      • People (Staff, Trustees, Board)
    • Landing Page Displays
      • Basic Landing Page Structure
      • Accordions
      • Big Hero
      • Call to Action
      • Centered Image with Caption
      • Code Block
      • Fat List
      • Mini Gallery
      • Multicolumn with Images
      • Nav Bar
      • Overlay Block
      • Panoramic Image
      • Photo and Copy
      • Quick Text
      • Sliders and Carousels
      • Spacer
      • Two Cards
      • Page Top Alerts
  • Contact
  • Website Design & Layout
    • Primary Navigation
    • Footers
    • Social Icons
    • Facebook Sharing Image
    • Button colors, shapes
    • Sidebar Additions
    • Logos
    • Menubar
    • Code (eg. Google Analytics)
    • Page Top Options: Slides, Video
  • How to...
    • Logging In and Out
    • The Document Tree
    • Create a Page
    • Choosing a Template
    • Basic Page Layout
    • Editing a Page
    • Adding Content: Text
    • Styling text: Blockquotes
    • Adding Content: Images
    • Cropping & Resizing Images
    • Adding Content: Links & PDFs
    • Adding Content: Video
    • Viewing a page
    • Page Commands: Move, Hide, Delete
    • Page Top Photos
    • Page Tops: Slides and Video
    • Feeds: Blog, Events, News, Logos
    • META Data
    • Add code to the template (Google Analytics, etc.)
    • Create Sitewide Navigation
  • Content Features
    • Blog
    • Blog Authors
    • Calendar
    • Media
    • News
    • Photo Galleries
    • Priorities
    • Publication Library
    • Legislative Tracker
    • People (Staff, Trustees, Board)
  • Landing Page Displays
    • Basic Landing Page Structure
    • Accordions
    • Big Hero
    • Call to Action
    • Centered Image with Caption
    • Code Block
    • Fat List
    • Mini Gallery
    • Multicolumn with Images
    • Nav Bar
    • Overlay Block
    • Panoramic Image
    • Photo and Copy
    • Quick Text
    • Sliders and Carousels
    • Spacer
    • Two Cards
    • Page Top Alerts
Contact
ProcessWire Made Easy: HollyWorks Help Site


Creative Consulting • Design for People • Smarter Programming • Global Publishing • Contact: Holly@HollyWorks.com

BoilerPlate Books, LLC |  Holly Valero  |  HollyWorks Web Design

Location: image fields and rich text editor

Before adding images to your website, it's a good practice to crop and resize them first, then minify them with a website like TinyPNG.

Why? Because they are big, fat files. Text editors tend to make images blurry if you resize images - so I recommend resizing them first. The image below began at 3.3mb. Cropped and resized it's 204k. Your pages will load much faster, and you won't max out your website space.

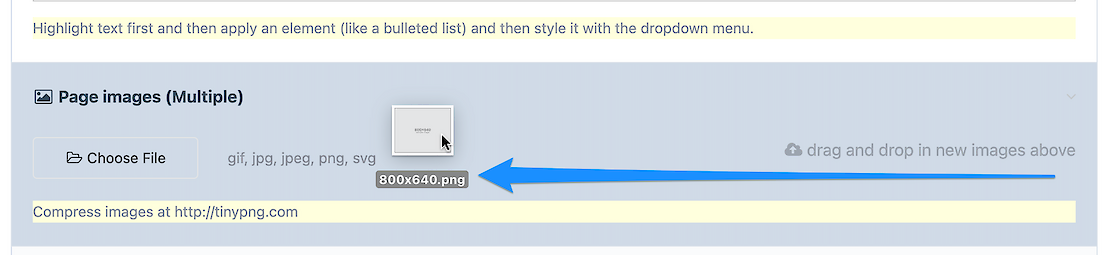
Now that you have a few images, drag them into the images field at the page bottom - and save your page.

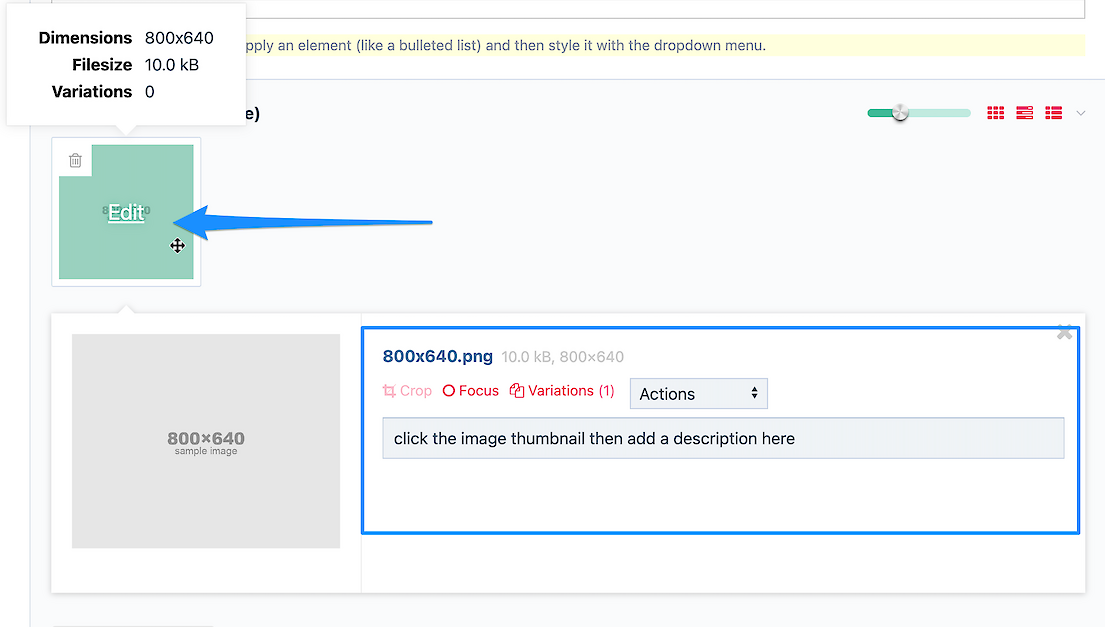
By selecting the thumbnail of any image in this field, you'll get image details – and a place to add a descriptive alt tag:

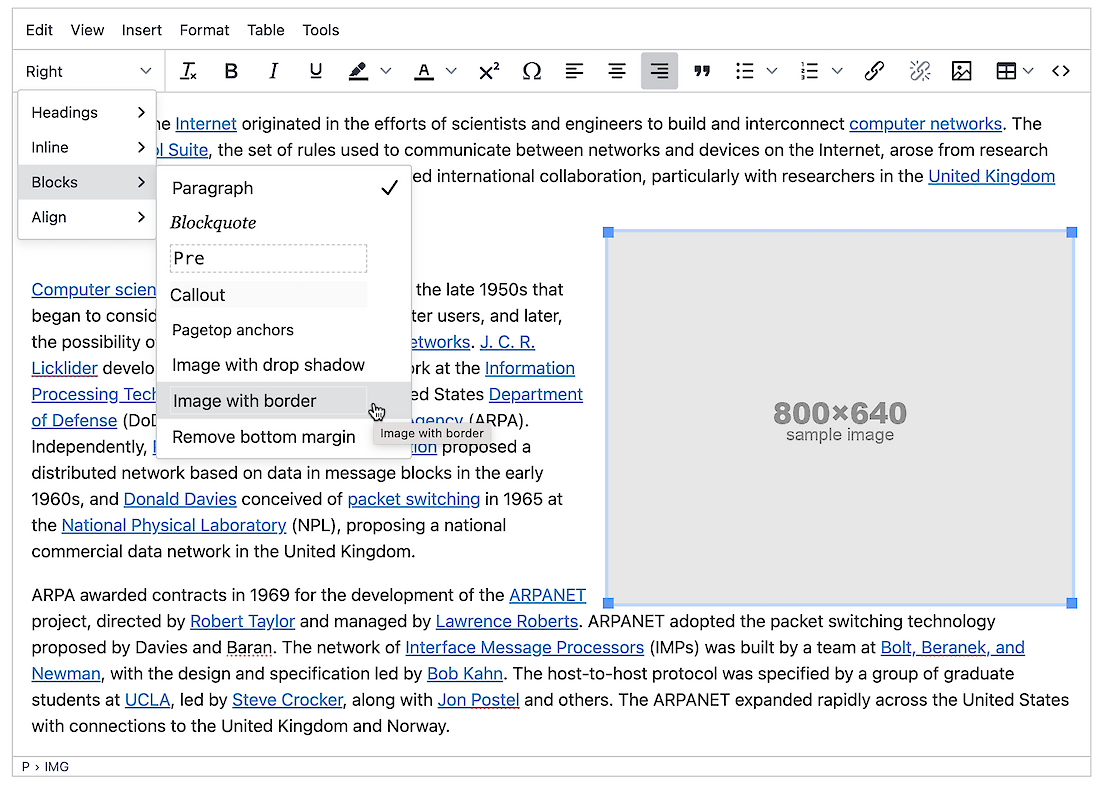
In the editor, place your cursor in an open area and select the image button in the navigation.

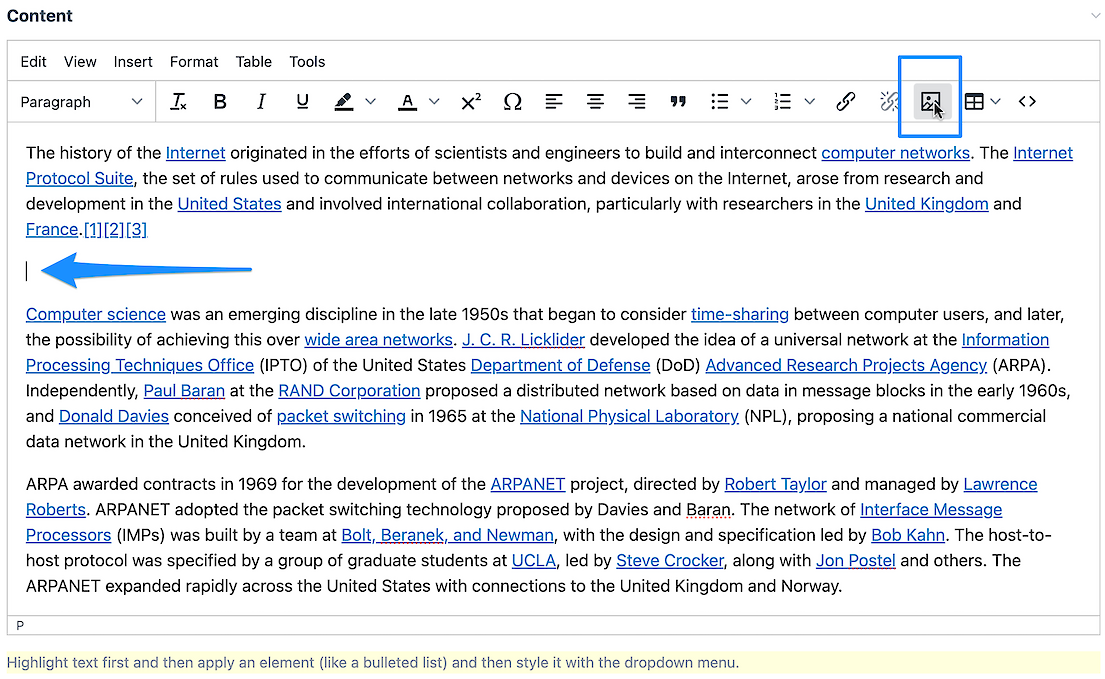
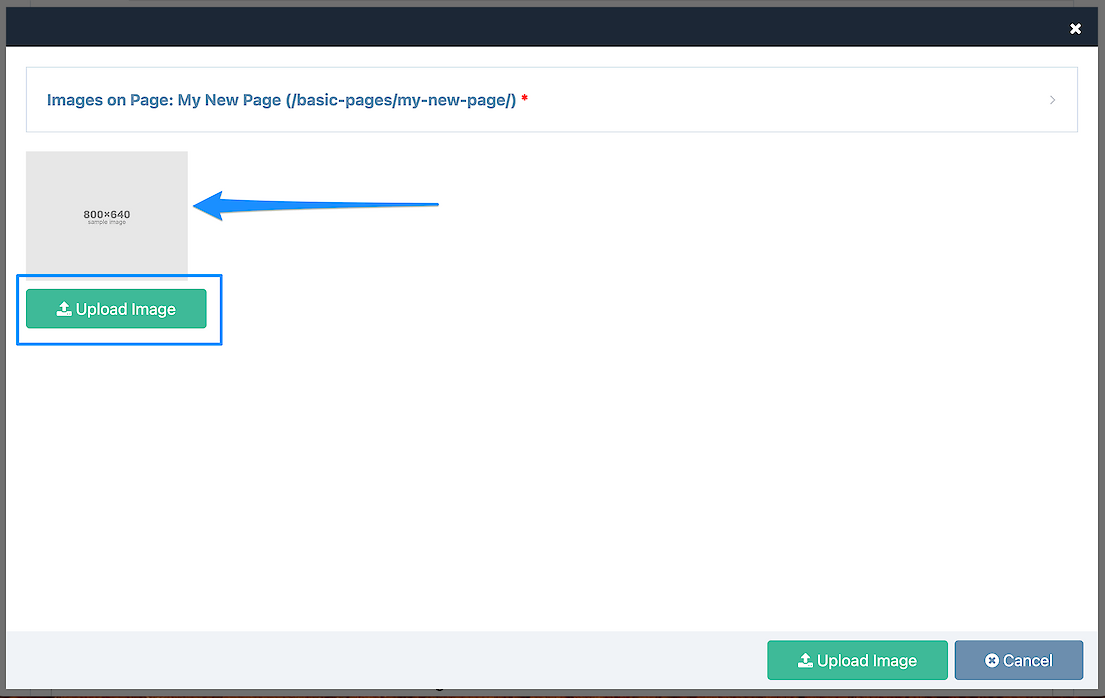
You should see a window with the various images you have uploaded. Select an image – or upload a new image.

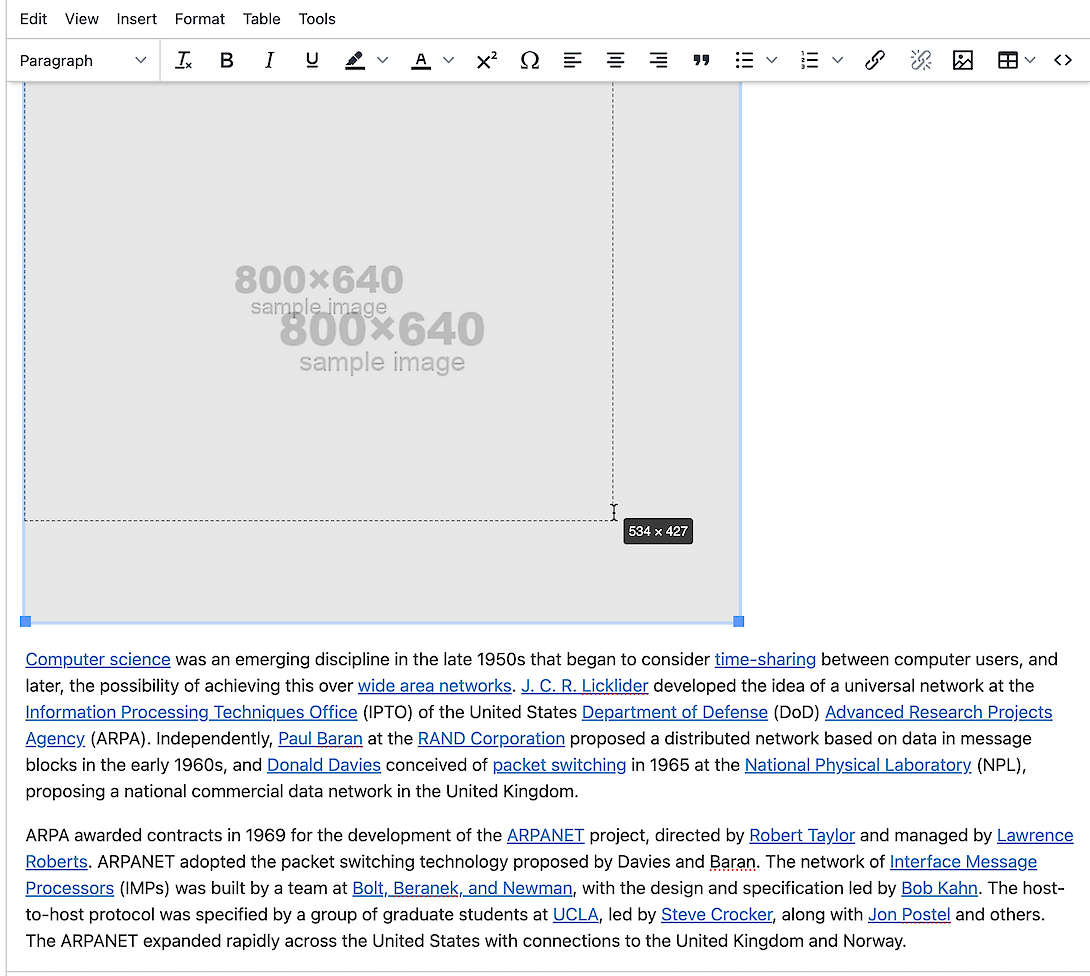
Once the image is the page, if you would like to make it smaller, select one of the blue corner handles and drag to shrink it.

You may want to align the image to the right, with copy flowing to the left. Select the image first, then click the right align icon in the navigation.

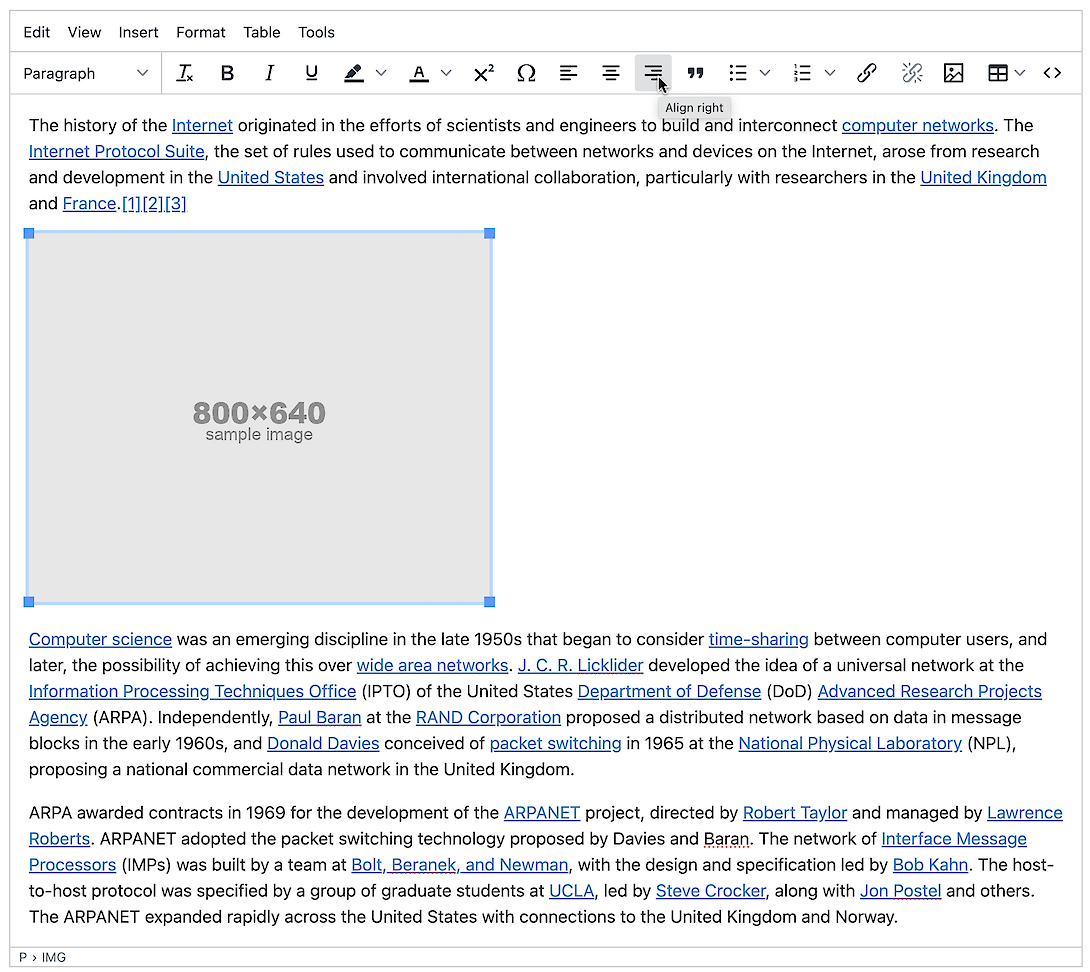
This will move your image to the right.

Finally, if you'd like to add a little padding and a border? Select: image with a border - from the drop down blocks menu.

  • Logging In and Out
  • The Document Tree
  • Create a Page
  • Choosing a Template
  • Basic Page Layout
  • Editing a Page
  • Adding Content: Text
  • Styling text: Blockquotes
  • Adding Content: Images
  • Cropping & Resizing Images
  • Adding Content: Links & PDFs
  • Adding Content: Video
  • Viewing a page
  • Page Commands: Move, Hide, Delete
  • Page Top Photos
  • Page Tops: Slides and Video
  • Feeds: Blog, Events, News, Logos
  • META Data
  • Add code to the template (Google Analytics, etc.)
  • Create Sitewide Navigation
ProcessWire Made Easy: HollyWorks Help Site


Creative Consulting • Design for People • Smarter Programming • Global Publishing • Contact: Holly@HollyWorks.com

BoilerPlate Books, LLC |  Holly Valero  |  HollyWorks Web Design

linkedin-in